That new job turned into a nightmare. It was all going well for a good few months, I was loving it. Lots to do ,very challenging, and then doubts started to sneak in. In turns out the guy that actually owns the company has a history of asset stripping, not paying suppliers and going insolvent.
Anyway, that isn't what this blog is about, but I now find myself jobless and without the means to spend cash on a hobby. So the bike is on hold, though if a do have to cash in the endowment to live off, maybe a complete old Honda for parts wouldn't make such a large dent...
I don't know how some people sleep at night. 100 people are now without income and jobless during one of the worst recessions in modern history, whist there is a very wealthy twat sunning himself on his big yacht in south Spain. Arse.
Anyway, check out this legend;
http://www.youtube.com/watch?v=Cx4Vi0T5Bko&feature=related
Friday 16 July 2010
Friday 5 February 2010
Oh Bugger!
Good news and bad.
I bought a fantastic pair of perfect ace bars from eBay for £10.50. Thats the good news.
The bad news is that the new kick start I bought from the same source is the wrong one. Not only that but after spending a few hours polishing up the front wheel I pulled the drum plate off to have alook at the brake pads, cleaned the whole thing up and then spotted a little Yamaha sign on the inside of the drum plate. Bugger!
I think it is going to be cheaper and easier to buy another complete bike and canabalise it for bits.
That's it for now, new job stops play...
Wednesday 18 November 2009
Everything you need to know about washers?
Nuts and bolts work work by placing a threaded shaft under tension. This tension, or preloading, is essential to strengthen the joint and reduce bolt fatigue due to fluctuating (variable) loads, as in the case of a machine part subject to vibration. If any of the parts involved deform under load--for example, if the contact area in the threads has any creep (or "plastic" flow), or any high spots on the contact surfaces between the threads flatten out, or the bolt or shaft lengthens microscopically, or the fastened parts compress--the joint will lose some of its tension. That's why metal car parts separated by a gasket need periodic re-tightening--as the gasket shrinks, the tension on the bolt decreases, and the parts aren't held together as tightly.
Lock washers can help with this situation by applying a spring force against the nut or bolt head. Any stretching or flattening of parts is likely to be much less than the compression of the spring washer, so the fastener won't loosen much.
Wavy washers are another type of washer meant to apply spring force, but they're not widely used as the spring force tends to be relatively small. Belleville washers, often called "Belleville springs," are washers shaped like a shallow cone or dish. The shape of these washers allows them to exert a constant spring force on a joint, even if the bolt or joint has significant slip or stretch after initial tightening. Belleville washers are typically used in high-stress applications such as structural steel.
Because the lock washers I've been describing generally have smooth surfaces, some people don't consider them true "locking" washers. They think the only real lock washers are the ones that, ironically, you turned up your nose at. Star-shaped lock washers help lock parts together because the points of the star both compress and dig into the mating surfaces when tightened. Thus they help combat the other enemy of the joint, loosening of the nut or bolt due to rotation. The downside, of course, is that these washers can damage the parts they're helping hold together. Sometimes people put smooth washers between sharp star washers and the parts to try to protect the surface, but that defeats the purpose, eliminating the washer's ability to grip the mating surfaces and allowing it to exert only a small spring force on the bolt. As a compromise, sometimes people use a washer with a rough-patterned surface to provide extra friction without damaging the working surfaces.
Why are washers called that? Using the Oxford English Dictionary (OED), we found that "washer," in the sense of "a perforated annular disc or flattened ring of metal, leather, or other material placed between two surfaces subject to rotative friction, to relieve friction and prevent lateral motion and unsteadiness," is "of doubtful origin." The earliest cite in the OED is from 1346 (spelled "whashers"), but the first quote that describes their use is from 1611:
‘an iron hoope, amongst gunners called a washer, which serues to keepe the iron pin at the end of the axeltree from wearing the naue.“
Why do nuts and bolts seem to magically loosen themselves? The most common reasons include corrosion in the threads (for metal fasteners), vibration or cyclic movement of the parts causing the nut or bolt to "walk" loose, and compression of the parts. Temperature changes can cause fasteners to loosen if the coefficients of expansion for fasteners and fastened are sufficiently different. Plastic fasteners are notorious for creep and "plastic" deformation (i.e., stretching) under load, loosening the nuts. If the parts being held together are also plastic, they too can deform, further reducing what little pre-loading exists. Some plastic fasteners are sensitive to temperature change, which could lead to loosening.
Notes
1. Some engineering manuals warn not to tighten split-ring lockwashers till they're flat. For example, the NASA Fastener Design Manual says:
The lockwasher serves as a spring while the bolt is being tightened. However, the washer is normally flat by the time the bolt is fully torqued. At this time, it is equivalent to a solid flat washer, and its locking ability is nonexistent. In summary, a lockwasher of this type is useless for locking.
I've thought about this and discussed the matter with engineering colleagues, and confess I don't understand why a split-ring lockwasher is useless when flat. As far as I know, a spring's resistance is greatest when fully compressed. It's possible the manuals mean that, once a split-ring lockwasher is flat, its cut ends no longer dig into the surfaces being fastened together and thus don't prevent the nut or bolt from turning, as the star washes discussed later in this report do. But the manuals don't explicitly say that.
References
Parmley, Robert O., Standard Handbook of Fastening and Joining, 1989
Spotts, M.F., Design of Machine Elements, 1985
"washer" (definition), Oxford English Dictionary Online, accessed April 28, 2005
Friday 13 November 2009
and now to the wheels...
I have managed a couple of sessions in the barn come garage in the last couple of weeks. The best time seems to be when my wife goes out, and I get to put the baby to bed. Suddenly all the chores I have seem to reduce in importance. I wonder how that happens?
 I have now started on the wheels. I am loving Dan's Online Motorcycle Repair Course;

My new 15 pound 2001 CG 125 shocks arrived via ebay. Not quite as shiny as I was expecting from the picture, but they will do for now. To be honest, what do you expect for 15 quid?
One of the things that is going to hold me back is spare cash for parts. It's all starting to mount up in my head. 140 for seat and front mudguard, 90 for tyres, 48 quid for a nice pair of tommaselli drop bars, 350 quid for paint, 100 (?) for powdercoating the frame... It's gonna be a few more pounds than I have spare right now.
I was planning on rebuilding the wheels, but I think they are just gonna have to make do with a damn good clean and polish, as will quite a few of the parts. My thinking now is to try and get the bike back together with the minimum of cash spent. Once it is back together I can start to replace parts that need changing over a period of time rather than waiting for everything to be immaculate from the off and never getting it back on the road.
I am liking these Tommaselli Ace bars available from http://www.discovolantemoto.co.uk/ ;

I have also found some tyres that should work with this bike - Michelin Pilot Sporty. They are a relatively sporty tyre (not just a clever name) aimed at small capacity bikes. They have sizes available that will fit. Marvellous.
So, what have I been doing. Well I have started to get the rolling chassis together. The swinging arm and 15 quid shocks are back on and I have put the front end back on with some new 5mm ball bearings and grease. I just hope I have done it correctly, I have read so many times that you should photograph, bag and label all the parts, but where's the fun in that. Daft sod.
I need to understand where you need to use a washer and where you don't. A bit of Googling I think. I guess I will just nut-lock everything.
Anyway, here is a picture of where we are at the moment.
I have now started on the wheels. I am loving Dan's Online Motorcycle Repair Course;www.dansmc.com/mc_repaircourse.htm
I gives really good, clear instructions with loads of photos, and exploded diagrams. I have never services drum brakes before, but good old Dan has pointed me in the right direction and given me the confidence to have a go. You really don't want to mess up your brakes, unless you fancy a bit of speedway that is. Actually I do, but not on this bike. By the way, his link to the bible is The Bible, not a really complete motorbike book.
Anyway, the wheels. I needed to get the ancient old tyres off. Very old tyres. Very old, very rigid and and impossibly solidly constructied. I have needed some tyre levers for ages, so this seemed like a good excuse. A bit of research pointed to Buzzetti levers, not cheap at 27 quid (ebay) for a set of 3, but they seem worth it. And boy do they work well. Look like they will last a lifetime, so will probably pay for themselves. I must admit I normally get my tyres changed at the shop, lazy I know, but no more!
There are plenty of videos on youtube that show you how to change bike tyres, but it ain't rocket science with the right tools.
I have had a quick go with wire wool, which seems to be the recommended solution for removing rust. My wheel rims are chrome, and I thought they were knackered, but they are actually coming up really well. Underneath the rust the chrome seems to have held up pretty well, not perfect, but like I said earlier, they'll do for now. The spokes have been painted previously, and will need to be sanded and painted again. I think I will have to pull them apart, clean, paint and rebuild the wheels. Now that is going to be interesting. I know with bicycle wheels it is a real skill, but I am hoping motorbike wheels are easier to do. With rims that thick surely there is less scope for them to be out of true.? We'll see.
Friday 25 September 2009
Some Progress!
At last some progress. I have had a few hours in the garage and have started to make some progress. It has been disturbed by the need to do a lot of work on my enduro bike for a 2 day rally in a couple of weeks time, but it has been good experience for me, including fitting new wheel bearings in the front wheel. I know to most it is very easy, but I have never done it before and am having to learn stuff from scratch, generally with help of a couple of excellent forums;


How did we cope before the Internet arrived?
Anyway I have been busy with the angle grinder and my wife's jewelry polishing machine, very handy!
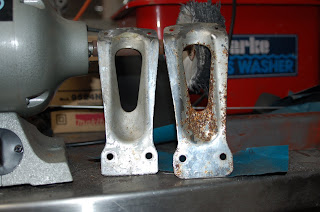
I have taken off the rear foot rest mountings. More tricky than I expected. Angle grinders are very vicious so you have to be really careful not to cut into anything that needs to stay intact, like a load bearing piece of frame for example. I think I made fairly decent job of it, not too much extra damage!

Next were the front forks. I am not doing a great deal to them other than give them a decent clean out and refresh the oil, and give them a damn good clean and polish. Elbow grease to the for.... I would like to run them with the upper springs exposed, or visible under clear fork gaitors. So perhaps some nice new shiny springs would look good?
I have discovered the best way to prepare for polishing seems to be by hand, especially where there are fiddly places to get to. Elbow grease and constant supply of fresh wet and dry. Start off with the gritty stuff, and work down to the fine stuff. I have just spent about £9 on polish and polishing mops from http://www.thepolishingshop.co.uk/, as my wife went mental when she saw what I had done to her jewelry stuff!
I still need to order the seat and a new front mudguard from the US. I was quoted about £40 for postage, but a seat and a mudguard for about £150 doesn't seem to bad. I will still have to wait for pay day though. Actually it is quite a lot of cash when you consider I only paid £155 for the whole bike...
I have salvaged the brackets from the old front mudguard, and will need to tidy those up a bit, but at least that will save some time and money, and at least they will fit. I might even get them chromed?

I need to get hold of some half decent new shocks for the bike too. The original ones are rubbish. I am struggling to find something that will fit, the 'leg length' seems to be the problem. There needs to be enough of a gap between the swing arm mounting point and where the spring starts so that the shock clears the chain. I was disappointed that Hagon were unable or unwilling to help. There are some Betor ones that will fit, but I have read somewhere that there quality is questionable. The hunt continues...
Thursday 16 July 2009
Chassis work
Now the bike is in bits it seems like the most logical place to start is the chassis. I have a list of jobs that need to be done and parts to be sourced.
The rear footrests and brackets need to come off, so out with the angle grinder. I am sure there are more subtle tools to use, but set an angle grinder to steel and it's like a fire-work going off! Note to self, move other bikes and fuel cans out of the way.
Source 1960's style bubble seat. It looks like I am going to have to order from the US - Airtech seem to do many different designs that will fit. They also do mudguards so I will probably get one of those will I am at it. Fitting the seat will be my first challenge as I imagine I will have to fabricate some new brackets and weld them on. Hacksaw - check, small selection of metal files - check, vice - check, welder and welding skills.... erm no.
The standard rear shocks just seem to be springs, so I will see if Hagon do something that actually functions as a damper that will fit
I would love to stick a new front end on, but I would imagine the required skills are going to be beyond me at this stage, so I will do the best I can with the standard forks. Apparently they work best with engine oil rather that fancy fork oil! The springs are on the outside, hidden by a rubber boot. I will see if I can polish them up and make them look half decent. It would be nice to have a disk on the front, but I will stick with the original drums for now.
Rear brake light and reg plate holder, going to need one, as inconspicuous as possible...
Bin the rear mudguard and centre stand.
Straighten the front foot pegs.
I guess once that is all done I can send it off for powder coating or painting? A nice shiny black I think.
Now where is the angle grinder?
Wednesday 15 July 2009
From this to this...
The idea of this blog is to help people like myself, with no real experience, to learning how to renovate/customise a 'vintage' motorbike.
The idea is to go from this (a 1975 Honda CB125S, non-runner);

To this (a very beautiful 1960's Honda race bike);

Now I know an old Honda CB125 that cost 150 quid is never going to look like a classic, expertly restored beauty like the one above, but the idea is to make a good effort and to learn all the relevant skills, or find the relevant expertise when needed so that for the next project I can confidently move on to bigger and better things.
Right now I have the bike stripped and in many parts in the garage. I have some plans and ideas, which I will share in the next blog, but very little idea or the technical expertise to make them happen. So my plan is to take it a step at a time and give it a go. It's gonna take some time, but here we go...
The idea is to go from this (a 1975 Honda CB125S, non-runner);
To this (a very beautiful 1960's Honda race bike);

Now I know an old Honda CB125 that cost 150 quid is never going to look like a classic, expertly restored beauty like the one above, but the idea is to make a good effort and to learn all the relevant skills, or find the relevant expertise when needed so that for the next project I can confidently move on to bigger and better things.
Right now I have the bike stripped and in many parts in the garage. I have some plans and ideas, which I will share in the next blog, but very little idea or the technical expertise to make them happen. So my plan is to take it a step at a time and give it a go. It's gonna take some time, but here we go...
Subscribe to:
Posts (Atom)